It’s finally done.
After months of coursework, labbing, troubleshooting, rewriting, and second-guessing my own topology, I finished my WGU capstone. Not just in the sense that I turned in a paper, but in the sense that I built something I could actually explain, defend, and use as a real talking point.
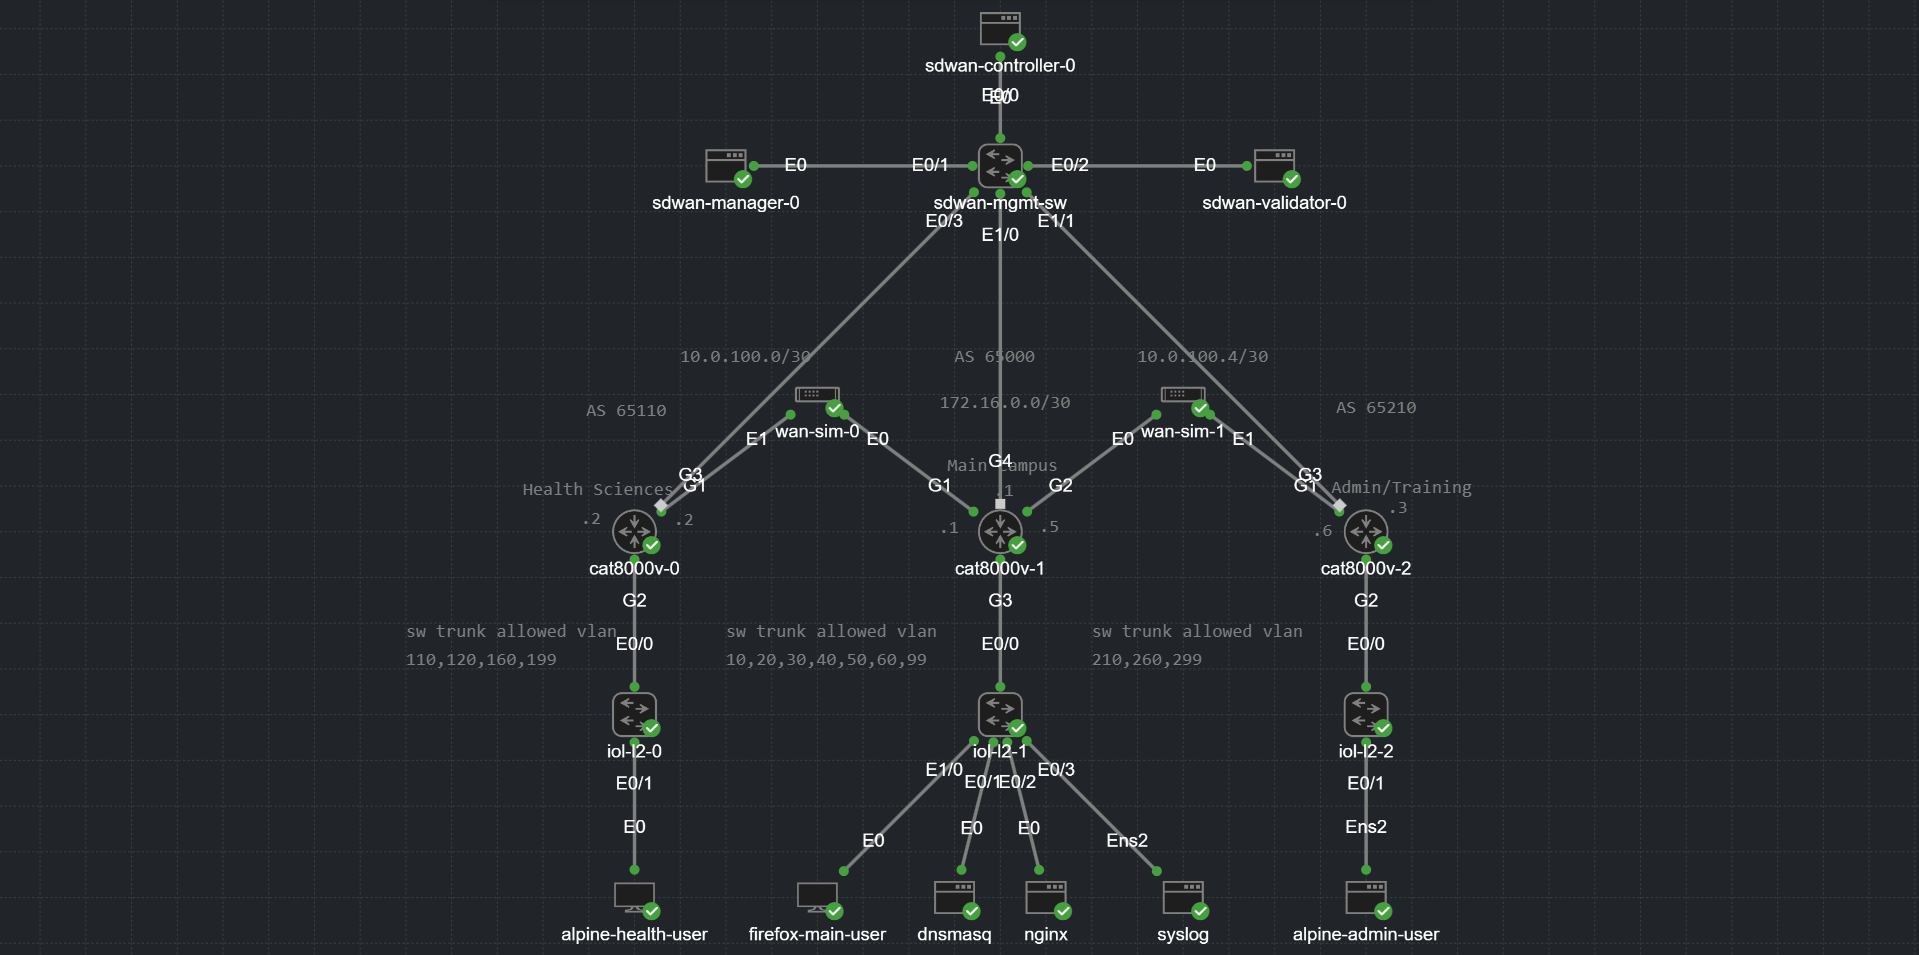
The project was a secure multi-site campus network proof of concept for a fictional school I called Greenfield Technical Community College. The goal was to design and validate a modernized WAN and campus network model for a Main Campus, a Health Sciences branch, and an Admin/Training branch. It was built in Cisco Modeling Labs using CAT8000V routers, IOL-L2 switches, WAN simulator nodes, centralized services, BGP, VLAN segmentation, ACLs, DHCP relay, DNS, syslog, and a small internal web service.
It started as a capstone.
It ended up becoming one of the clearest examples I have of what I know outside of just coursework.
The Idea Behind the Project
The fictional client had a very realistic problem. They had multiple campus locations, centralized services at the Main Campus, and branch sites that depended on WAN connectivity to reach those services. The design needed to account for segmentation, guest isolation, operational visibility, centralized services, and degraded WAN behavior.
I framed the project as an SD-WAN-oriented proof of concept, but I was careful not to claim it was a full production SD-WAN deployment. That distinction mattered a lot. A real Cisco SD-WAN deployment involves controllers, certificates, licensing, redundant transports, templates, control connections, and a lot of operational overhead. My project focused on the routed WAN and campus design underneath that kind of architecture.
In other words, I wanted to prove the foundation.
Could the sites exchange routes dynamically? Could users get DHCP from a centralized service? Could DNS resolve internal services? Could approved users access the internal web server while guest users were blocked? Could logs be collected centrally? Could WAN degradation be simulated and observed?
That was the actual goal.
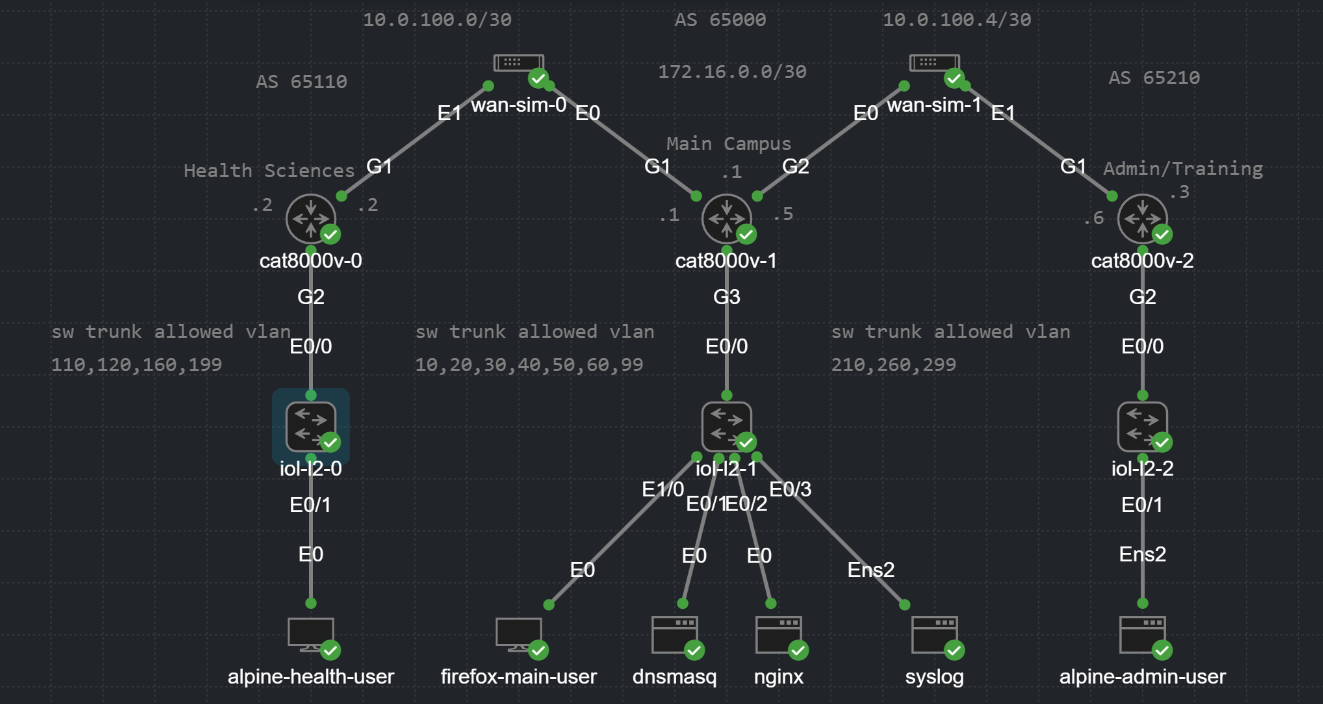
Figure 1. Final Cisco Modeling Labs topology showing Main Campus, Health Sciences, Admin/Training, CAT8000V routers, IOL-L2 switches, WAN simulators, and centralized services.
Building the Three-Site Topology
The final topology had three sites.
Main Campus acted as the hub and shared-services location. Health Sciences and Admin/Training were the two branches. Each site had a CAT8000V router and an IOL-L2 switch. The branches connected back to Main Campus through separate WAN simulator nodes, which gave me a way to test normal, degraded, failed, and restored WAN behavior.
Main Campus hosted the services:
dnsmasq handled DNS and DHCP.
nginx hosted a basic internal web page.
Ubuntu rsyslog collected centralized logs.
This was simple on paper, but the details mattered. Each site had its own VLANs and subnets. The routers used 802.1Q subinterfaces as the default gateways. Non-server VLANs used ip helper-address to relay DHCP to the centralized dnsmasq server at Main Campus.
That ended up being one of the first places where the lab reminded me that simple services can become annoying when they are placed behind real routing boundaries.
Why I Used BGP
Originally, I debated whether I should use OSPF or BGP. OSPF would have been easier, and for a simple campus lab it would have made plenty of sense.
But this was supposed to represent a WAN modernization project, and BGP felt like the better fit.
I used eBGP between the three site routers. Main Campus used AS 65000, Health Sciences used AS 65110, and Admin/Training used AS 65210. Each site advertised its local VLAN networks and WAN transit subnet. That made the lab feel much more like a real WAN edge design, where each site is treated as its own routing domain and route exchange happens intentionally at the edge.
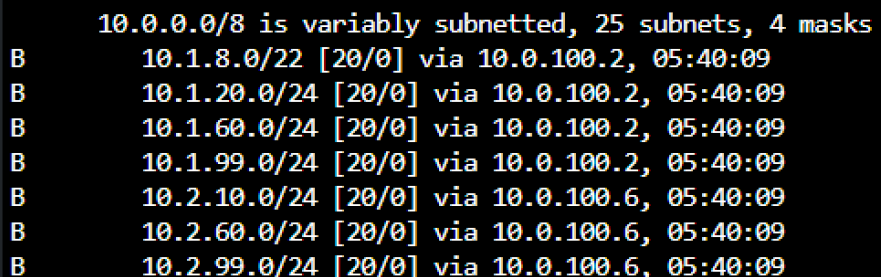
Figure 2. BGP evidence showing dynamic route exchange between Main Campus and the branch routers.
The nice thing about BGP in this project was that it made the validation much more meaningful. I could show neighbor relationships, learned routes, advertised prefixes, and the impact of WAN impairment on reachability.
It also gave me a better interview story than “I added a few static routes.”
Centralized DHCP and DNS
The centralized services were where the project started to feel more like a real network and less like a topology diagram.
The dnsmasq server lived in Main Campus VLAN 40 at 10.0.40.10. It provided DHCP scopes for every campus VLAN and local DNS records for internal services like web.gtcc.cx, dns.gtcc.cx, and syslog.gtcc.cx.
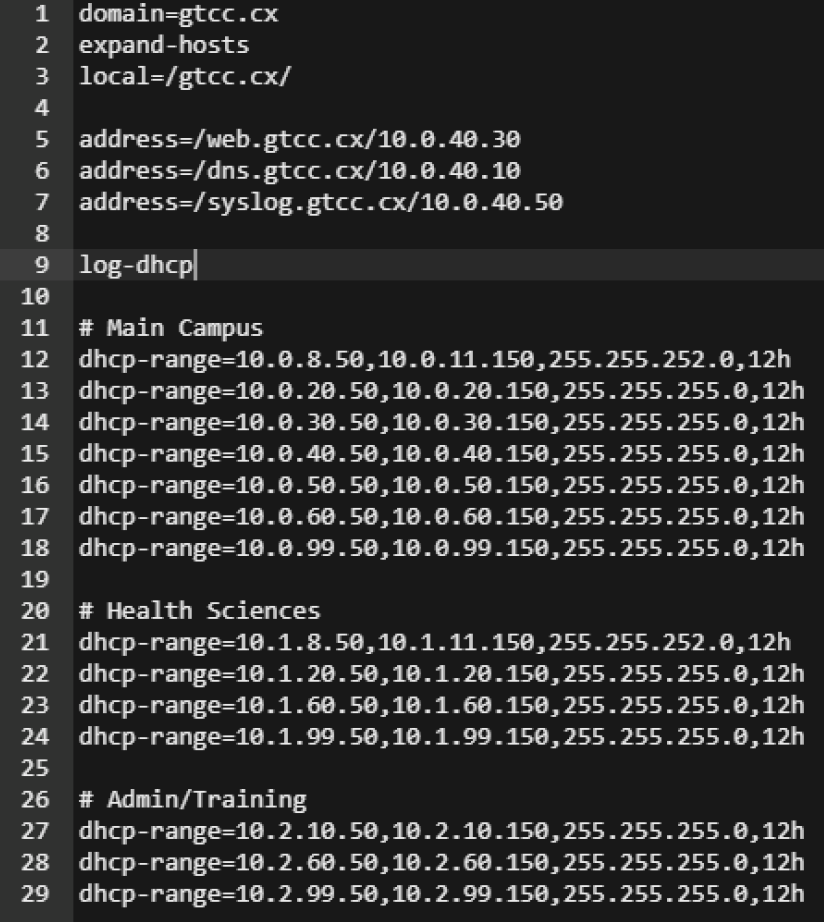
Figure 3. dnsmasq providing centralized DHCP scopes and internal DNS records for the proof of concept.
This took more troubleshooting than I expected. DHCP relay is one of those things that seems obvious until the server does not hand out the address you expect. The relay gateway address, the scope, the mask, and the actual subnet all had to line up correctly. If they did not, dnsmasq would either ignore the request or only recognize the local server VLAN scope.
Eventually, I got it working across the campus VLANs. That was a big milestone because it proved that the branches were not just statically configured islands. They were actually consuming centralized infrastructure services across the routed WAN.
The Internal Web Service
The web server was intentionally simple. I put an Nginx server at 10.0.40.30 and gave it the DNS name web.gtcc.cx.
The page itself was not the point.
The point was having a real internal service to test against. Ping is useful, but it does not tell the whole story. A web service let me validate DNS, routing, ACL behavior, and WAN impairment in a way that felt more realistic.
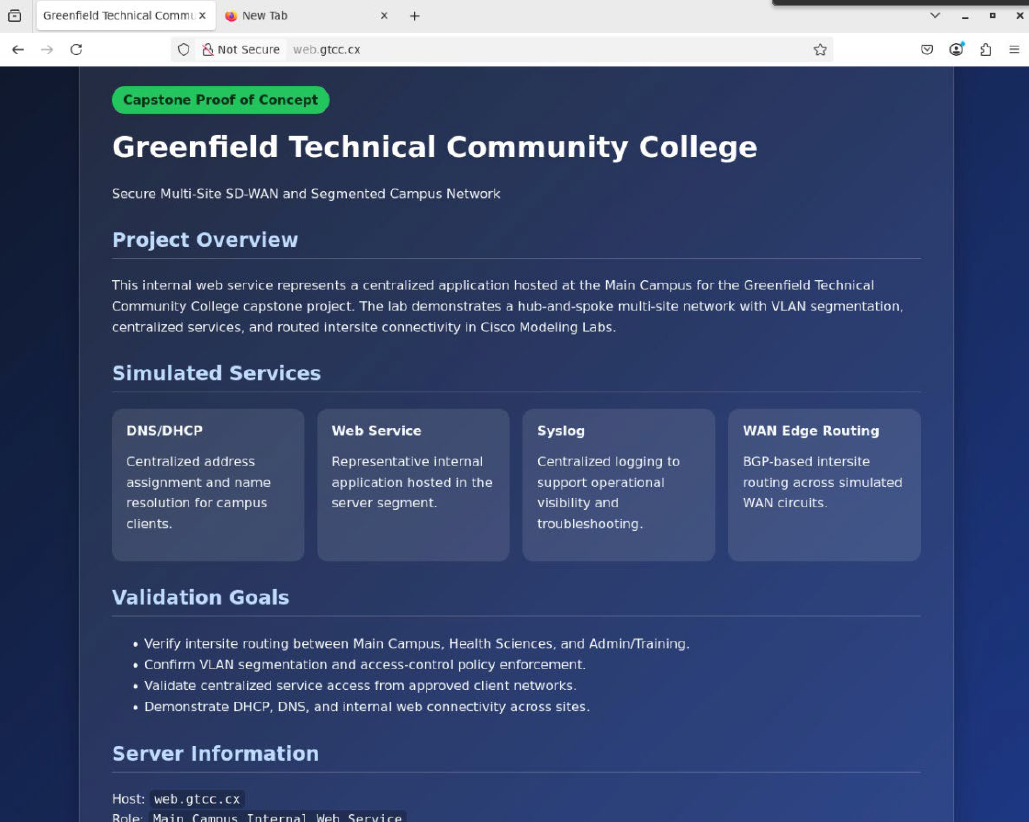
Figure 4. Approved internal client reaching the Nginx web server at web.gtcc.cx.
Once that was working, I had a clean test target for the rest of the project. Approved users should be able to reach it. Guest users should be able to resolve it but not access it. WAN impairment should affect reachability in a visible way. The service gave the topology something meaningful to protect and validate.
Guest Isolation
The guest isolation test was probably my favorite part of the capstone evidence.
The Health Sciences guest VLAN could use DHCP and DNS, but it could not access protected internal resources. That meant a guest client could resolve web.gtcc.cx to 10.0.40.30, but attempts to ping or browse to the internal web server failed because the guest-iso ACL denied access to internal 10.0.0.0/8 destinations.
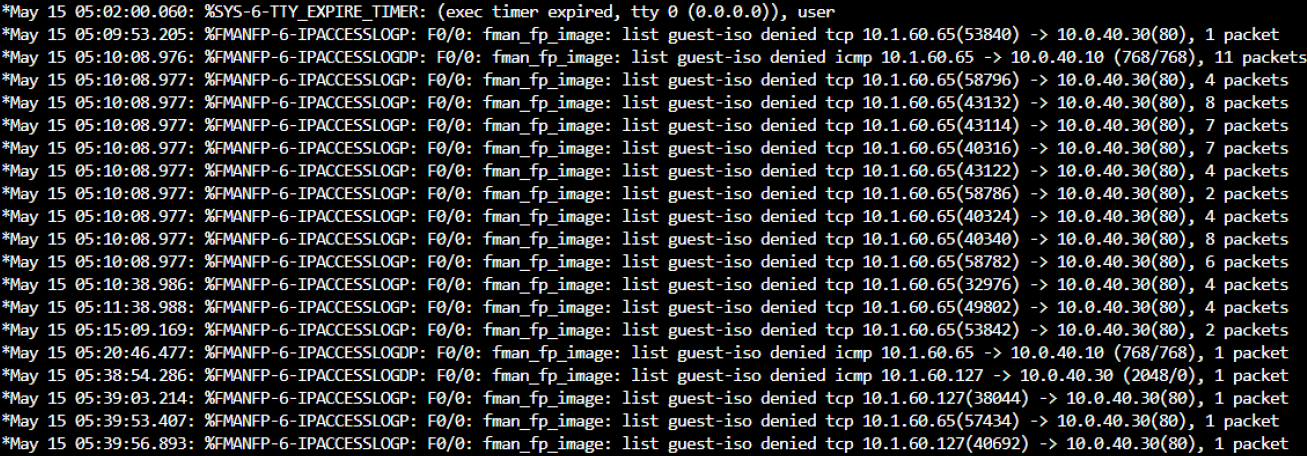
Figure 5. Guest VLAN client resolving web.gtcc.cx while ICMP and HTTP access to the internal web server are blocked.
This was a good reminder that DNS resolution and access are not the same thing. A client can know where something is and still not be allowed to reach it.
The evidence looked roughly like this from the guest side:
Client VLAN: Health Sciences Guest
Client subnet: 10.1.60.0/24
Default gateway: 10.1.60.1
Internal DNS: 10.0.40.10
Internal web service: web.gtcc.cx / 10.0.40.30

Expected behavior:
DNS resolution succeeds.
ICMP and HTTP access to protected internal resources fail.
nslookup web.gtcc.cx
Name: web.gtcc.cx
Address: 10.0.40.30

ping web.gtcc.cx
From _gateway (10.1.60.1): Packet filtered

wget http://web.gtcc.cx
Resolving web.gtcc.cx... 10.0.40.30
Connecting to web.gtcc.cx... failed: No route to host
That was the key behavior I wanted to prove.
The guest client was not broken. DNS was not broken. Routing was not broken. The firewall policy was doing its job.
On the router side, the guest-iso ACL followed the same idea: allow the minimum required services first, then deny guest access to internal campus networks.
permit udp any eq bootpc any eq bootps
permit udp 10.1.60.0 0.0.0.255 host 10.0.40.10 eq domain
permit tcp 10.1.60.0 0.0.0.255 host 10.0.40.10 eq domain
deny ip 10.1.60.0 0.0.0.255 10.0.0.0 0.255.255.255 log
In plain English:
Allow guest DHCP
Allow guest DNS to the internal DNS server
Deny guest access to protected internal networks
Log denied traffic for validation
That was one of the most satisfying parts of the project because it proved the policy model. The network was not just connected. It was segmented intentionally.
Centralized Syslog
The syslog portion gave me one of the more practical troubleshooting lessons in the project.
Originally, I planned to use the prebuilt CML syslog appliance. That would have been cleaner in the report and easier to explain. But the appliance did not behave reliably with the boot customization I needed, and after spending too much time trying to force it, I replaced it with an Ubuntu server running rsyslog.
That ended up being the right decision.
The deliverable was not “use this exact image.” The deliverable was centralized logging. The Ubuntu server lived at 10.0.40.50, and the campus routers sent logs to it.
Syslog server: 10.0.40.50
Location: Main Campus server VLAN
Service: Ubuntu rsyslog
Purpose: Central log collection from campus routers
The router-side configuration was simple, but useful:
logging host 10.0.40.50
logging origin-id hostname
That gave the design operational visibility instead of making every router its own isolated source of truth.
Why I replaced the original syslog node
The original CML syslog appliance looked like the easiest path at first, but it was not behaving reliably with the customization I needed. Rather than keep forcing the wrong tool into the design, I replaced it with an Ubuntu server running rsyslog.
That was a better engineering decision.
The requirement was centralized logging, not loyalty to a specific appliance image.
This was also a good example of implementation flexibility. In real projects, the first tool you pick is not always the one you keep. What matters is whether the requirement is still met.
In this case, it was.
WAN Impairment Testing
The WAN simulator nodes were what tied the project back to the SD-WAN idea.
Each branch had one simulated WAN circuit back to Main Campus. I tested the environment under normal conditions, degraded conditions, failure, and restoration. I originally had separate screenshots for each phase, but that felt heavy for a blog post. The behavior is easier to understand in a small table and a few command-style notes.
| Test | WAN Condition | Expected Result |
|---|---|---|
| Baseline | No impairment | Normal reachability |
| Degraded | Latency, jitter, loss, reduced bandwidth | Higher response times and less reliable service access |
| Failure | 100% packet loss | Branch loses reachability over that WAN path |
| Restoration | Impairment removed | Reachability returns |
For the degraded test, I added latency, jitter, packet loss, and reduced throughput. The result was visible in the ping behavior and helped show how the topology responded when the transport was no longer clean.
Baseline:
latency: 0 ms
jitter: 0 ms
loss: 0%
bandwidth: unrestricted / high

Degraded:
latency: 80 ms
jitter: 20 ms
loss: 2%
bandwidth: reduced
For failure testing, I used 100% packet loss. Then I restored the WAN simulator settings and showed connectivity returning.
Failure state:
WAN simulator set to 100% packet loss
Branch-to-main reachability fails

Restored state:
WAN simulator impairment removed
Branch-to-main reachability returns
What this did and did not prove
This demonstrated WAN impairment, failure, and restoration behavior.
It did not demonstrate automatic failover.
Each branch only had one simulated WAN path back to Main Campus, so there was nowhere else for traffic to go during a failure. That was intentional scope control. A full redundant SD-WAN design would need additional circuits, routing policy, and failover validation.
I was very careful in the report not to call this automatic failover. It was not. The honest claim was that the lab demonstrated WAN impairment behavior, not redundant path steering.
That distinction was important.
It is easy to make a project sound more impressive by overstating it. I wanted the final report to be technically honest. It was a proof of concept, not a production SD-WAN fabric.
The SD-WAN Controller Rabbit Hole
After the capstone was submitted, I started playing with the actual Cisco SD-WAN controller stack in the same general topology. I powered on SD-WAN Manager, SD-WAN Controller, and SD-WAN Validator, connected them through a management switch, and started trying to bring the control plane up.
That quickly reminded me why I kept the controller-based SD-WAN architecture as future-state only in the report.
The Manager was resource-heavy. The backend services were slow to initialize. The configuration database did not start cleanly at first. The web UI came up, but the backend was not ready. Certificates and onboarding were clearly going to be their own project.
That did not make the SD-WAN work impossible, but it did validate the scope decision.
A full controller-based SD-WAN deployment is not just “add three nodes.” It is its own environment, with its own lifecycle, trust model, resource needs, and operational requirements.
What was implemented versus future-state
Implemented in the capstone:
Routed multi-site WAN foundation
eBGP route exchange
VLAN segmentation
Centralized DNS/DHCP
Internal web service
Syslog visibility
Guest isolation
WAN impairment testing
Future-state only:
SD-WAN Manager
SD-WAN Controller
SD-WAN Validator
Edge onboarding
Certificates
Templates
Full controller-based policy
The capstone proved the network foundation. The controller stack would be a separate project.
For the capstone, the right decision was to show the future-state controller architecture without pretending it was implemented.
That might sound less flashy, but I think it made the project stronger. The scope was honest, and the evidence matched the claims.
Using the Capstone in an Interview
One of the coolest parts of this project was that I got to talk about it in a job interview.
It came up naturally, and it immediately made the conversation more concrete. I was not just saying that I understood routing, segmentation, or WAN design. I was able to talk about something I had actually built.
I could explain why I chose BGP instead of OSPF. I could describe how the VLANs were structured. I could talk through DHCP relay, dnsmasq behavior, syslog replacement, guest ACLs, WAN impairment, and the difference between a proof of concept and a full SD-WAN deployment.
That gave the conversation a lot more weight.
It lent credibility to my knowledge outside of school because I was not just repeating terms from a textbook. I had configuration decisions, failures, fixes, and evidence. I had a topology I could reason through.
That matters.
A degree checks a box, but a project gives you something to talk about.
What I Took Away
This project reinforced something I have been learning over and over again: good networking work is rarely about a single technology.
The project had BGP, but it was not just a BGP project.
It had VLANs, but it was not just a switching project.
It had syslog, but it was not just a logging project.
It had WAN simulators, but it was not a full SD-WAN project.
The value came from how all of those pieces fit together. Routing, segmentation, services, visibility, and validation all had to support the same design.
It also reminded me that documentation is part of the engineering work. The lab had to function, but the report had to prove that it functioned. Screenshots had to match captions. Claims had to be accurate. Scope had to be clear. If the evidence did not support the statement, the statement needed to change.
That kind of discipline matters in the workforce too.
And that ended up being more than theoretical. The capstone came up during a job interview, and being able to talk through a project I actually built gave the conversation a lot more weight. I was not just describing concepts from school. I was explaining real design decisions, failure points, troubleshooting steps, and validation evidence.
That interview turned into an offer, and I accepted it.
So in a very real way, this project helped bridge the gap between school, lab work, and the next stage of my career.
Why This Was Worth Doing
I chose the BSIT at WGU partly because I wanted room to shape the degree around the kind of work I actually care about. This capstone gave me that room.
It let me take a general IT requirement and turn it into a network engineering project with real routing, segmentation, centralized services, logging, and WAN behavior testing.
It was not perfect.
It was not production.
It was not a full Cisco SD-WAN deployment.
But it was real enough to troubleshoot, real enough to document, and real enough to discuss with engineers outside of school.
That is what made it worthwhile.
It also came at an interesting transition point for me. A lot of my technical growth so far has centered around route/switch, campus networking, infrastructure fundamentals, and security-minded segmentation. That foundation is not going away, but my next professional chapter is going to push me into a new area: VoIP.
I will be breaking into the voice world, and I am genuinely excited for it.
Routing and switching still matter there. Maybe more than people realize. Voice is not magic; it still rides on networks, depends on QoS, relies on clean routing, and breaks in very network-engineering ways. But it also brings a whole new layer of technologies and design considerations that I have been studying ahead of my start date.
I have been digging into things like CUCM, dial plans, route patterns, translation patterns, SIP trunks, Cisco Expressway, CUBE, codec negotiation, call routing, and how voice traffic moves between internal systems, carriers, and remote users.
It is a pivot, but not a reset.
It feels more like expanding the map.
What’s Next
The next chapter is VoIP.
I still want to revisit SD-WAN eventually, but right now my focus is shifting toward the technologies I will be working with professionally: Cisco Unified Communications Manager, dial plans, Expressway, CUBE, SIP, voice gateways, and the operational side of keeping real-time communications healthy.
That is going to mean a lot of learning.
It will probably mean a lot of labbing too.
I expect the blog to start reflecting that shift. There will still be route/switch content, because that foundation is not going anywhere, but I want to start documenting the voice side as I learn it. CUCM notes, dial plan concepts, SIP troubleshooting, CUBE behavior, Expressway architecture, and whatever else I run into along the way.
For now, I am happy with where the capstone landed.
It gave me a complete story: school, lab, troubleshooting, documentation, an interview talking point, and now a bridge into a new role.
Not bad for a final project.
Thanks for reading, and God bless.